
Shopify Product Photography Ideas for Beginners

Last Updated on October 15, 2026
Product photographs do more than make a Shopify store attractive. They help shoppers understand the product, judge its quality, compare variations, see its size, and decide whether it fits their needs. When customers cannot hold an item in person, your images must answer many of the questions a retail display would normally answer.
This beginner’s guide explains Shopify product photography from planning a shot list through uploading optimized images. You will learn which photographs to take, how to build an inexpensive home setup, how to use a smartphone effectively, and how to edit images without misrepresenting the product.
If you have not chosen your product or business model, begin with my guide to starting an online store. It covers product validation, costs, fulfillment, platform selection, testing, and launch planning in order.
Key Takeaways
- Start with an accurate white-background image, then add angles, details, scale, lifestyle context, packaging, and everything included.
- A smartphone, stable tripod, window light, white sweep, reflector, and repeatable shot list are enough for many beginner stores.
- Keep lighting, framing, crop, aspect ratio, and color treatment consistent across a collection.
- Edit dust, exposure, crop, and background distractions, but do not change the product’s real color, proportions, texture, or included features.
- Compress images, use descriptive file names and alt text, inspect mobile pages, and test zoom and variant behavior before launch.
Shopify image tools and documentation verified October 15, 2026. File limits, supported formats, media features, theme behavior, and promotional terms can change. Confirm current requirements inside Shopify before creating a large photography workflow.
What Is Shopify Product Photography?
Shopify product photography is the collection of images used to present products across your online store. The first image often appears on collection pages, search results, featured-product sections, the cart, checkout, and other sales surfaces. Additional images help shoppers examine the product page in more detail.
Good ecommerce photography is accurate before it is artistic. The customer should be able to identify the product, understand its important features, judge its size and finish, compare options, and see what arrives after purchase. A beautiful image that hides a limitation or creates the wrong expectation can increase returns and support problems.
For inspiration, study the visual hierarchy and product-page lessons in these successful Shopify store examples. Use them to identify useful presentation patterns without copying another brand’s photographs, styling, or claims.
Is Shopify Good for Product Photography?
Shopify supports images, videos, and compatible 3D models as product media. You can reorder media, choose the first item that represents the product, add alt text, crop images, and display media through your theme. Shopify’s documentation currently allows up to 250 media items per product, although a useful product page rarely needs anything close to that number.
The platform provides the media tools, but it cannot decide which photographs your customer needs or guarantee that a theme will crop every image the way you expect. My complete Shopify review explains the broader strengths, costs, and limitations of the hosted platform.
If you want to build the store while following this guide, you can create your Shopify account here. This is an affiliate link, so I may earn a commission at no additional cost to you.
Shopify Product Photography Shot List
Create a written shot list before setting up the camera. The following ideas form a dependable starting library. Not every product needs every photograph, but each image should answer a specific buying question.
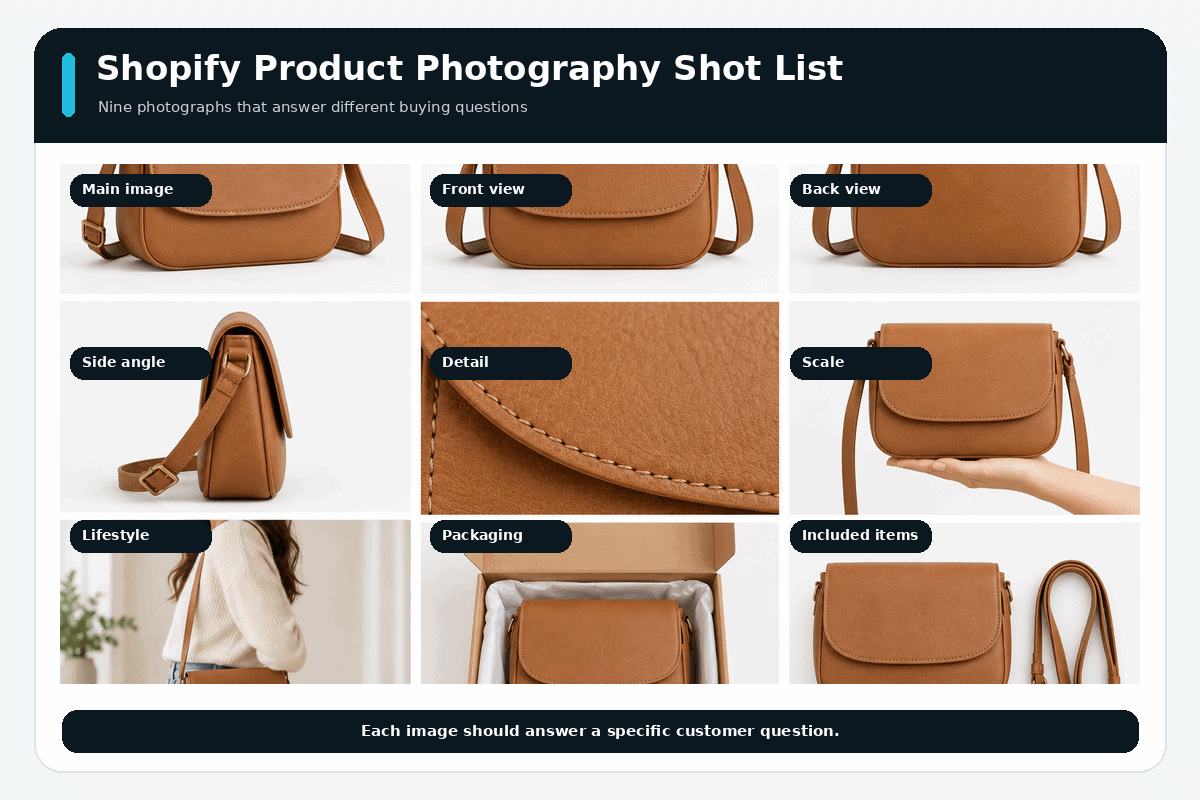
1. Clean Main Product Image
Start with one clear image showing the complete product against a neutral, uncluttered background. Make the item large enough to understand at thumbnail size. This should usually be the most accurate and universally useful image rather than the most dramatic composition.
Keep the product centered consistently and leave enough negative space for theme cropping. If the product is a set, make it immediately clear whether the main image shows one item or everything included.
2. Front, Back, and Side Views
Photograph the product from the angles a shopper would inspect in person. A bag might need front, back, side, bottom, open, and interior views. Clothing might need front, back, side, collar, cuff, and closure images. Keep the camera position fixed and rotate the product when practical so the framing remains consistent.
3. Close-Up Detail Images
Show the details that influence quality and value: stitching, texture, print, hardware, seams, controls, ports, ingredients, labels, finish, fasteners, and interior construction. A close-up should reveal information, not merely repeat the main image at a different crop.
4. Size and Scale Reference
Dimensions in the description are useful, but many shoppers understand scale faster through a photograph. Show the product in a hand, on a model, beside a familiar object, in a room, or next to a simple dimension graphic. Use a reference that is consistent and not misleading.
5. Lifestyle Image
Place the product in a realistic setting that matches its intended use. Lifestyle photographs help customers imagine ownership and communicate mood, audience, and environment. Keep the product identifiable and avoid props that could be mistaken for included items.
6. Product in Use
Demonstrate the primary action: opening the container, wearing the garment, installing the accessory, using the tool, adjusting the strap, or applying the product. An in-use sequence can answer questions that a static hero image cannot.
7. Packaging and Unboxing
Show the packaging when presentation, storage, gifting, protection, or sustainability affects the purchase. Photograph the unopened package, opened package, protective materials, labels, and how the product is arranged. Do not display premium packaging unless customers will actually receive it.
8. Everything Included
Lay out the product, accessories, cables, instructions, refill parts, storage case, or bonus items. Clearly distinguish included components from decorative props. This image can prevent disappointment and reduce “Does this come with…?” support questions.
9. Color and Variant Comparison
Photograph each sellable color, material, finish, pattern, size, or configuration. Use the same lighting and camera settings so customers can compare variations fairly. Connect the correct media to the correct Shopify variant and test the selection behavior on the product page.
10. Fit or Dimension Demonstration
For apparel, show how the item fits from multiple angles and provide the model’s relevant measurements and worn size. For home goods, show the product in an appropriately scaled room. For technical products, label measurements and clearances without covering important details.
11. Problem-and-Solution Image
Show the specific problem the product addresses and the realistic result it creates. Avoid fabricated transformations, guaranteed outcomes, or comparisons that change lighting and conditions to exaggerate the result. The photograph should demonstrate function rather than manufacture a claim.
12. Short Product Video or 360-Degree View
Use motion when fit, texture, scale, sound, assembly, flexibility, or operation is difficult to communicate with still images. Keep the clip short, stable, well lit, and focused on the product. A video should add information rather than delay the page with a decorative loop.
If you are still choosing what to photograph, the Shopify product ideas guide compares physical, digital, subscription, service, print-on-demand, and sourced product models.
Beginner Product Photography Equipment
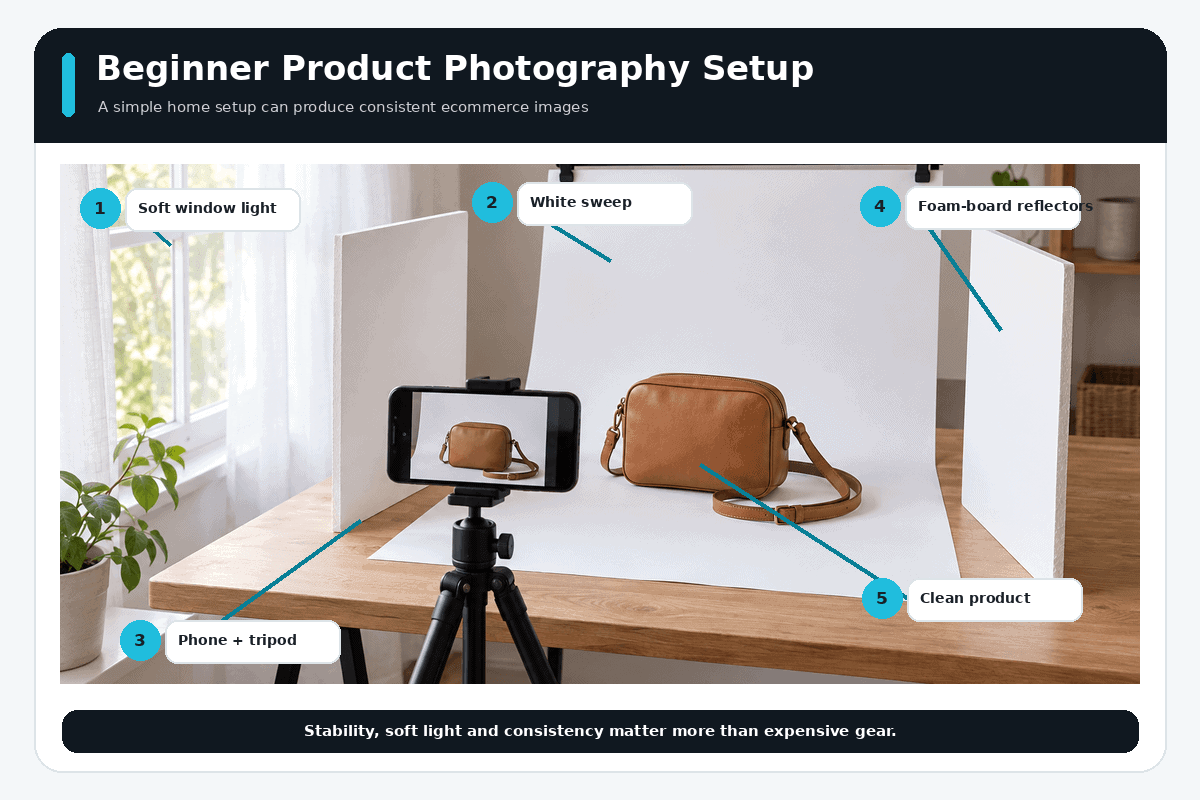
You do not need a professional studio to create a useful first catalog. Start with the simplest setup that produces repeatable, accurate results.
- Camera: use the best smartphone, point-and-shoot, mirrorless camera, or DSLR already available to you.
- Tripod: stabilize the camera and keep framing consistent across products and variants.
- White sweep: use seamless paper, poster board, or fabric that curves from the wall onto the table without a visible horizon line.
- Light: begin with a large window providing indirect light, or use a matched continuous-light setup when natural light is unreliable.
- Reflector: white foam board can bounce light into the shadow side of the product.
- Diffusion: a proper diffuser or sheer white material can soften harsh light, provided it is kept safely away from heat-producing equipment.
- Cleaning kit: keep microfiber cloths, lint rollers, compressed air appropriate for the product, gloves, and basic styling tools nearby.
- Color reference: a neutral gray or color reference can help maintain accurate white balance across a large catalog.
The real expense is not only the camera. Budget for samples, props, models, retouching, software, storage, reshoots, and ongoing catalog updates. My Shopify pricing guide explains the platform and operating costs to include in your store budget.
How to Take Shopify Product Photos Step by Step
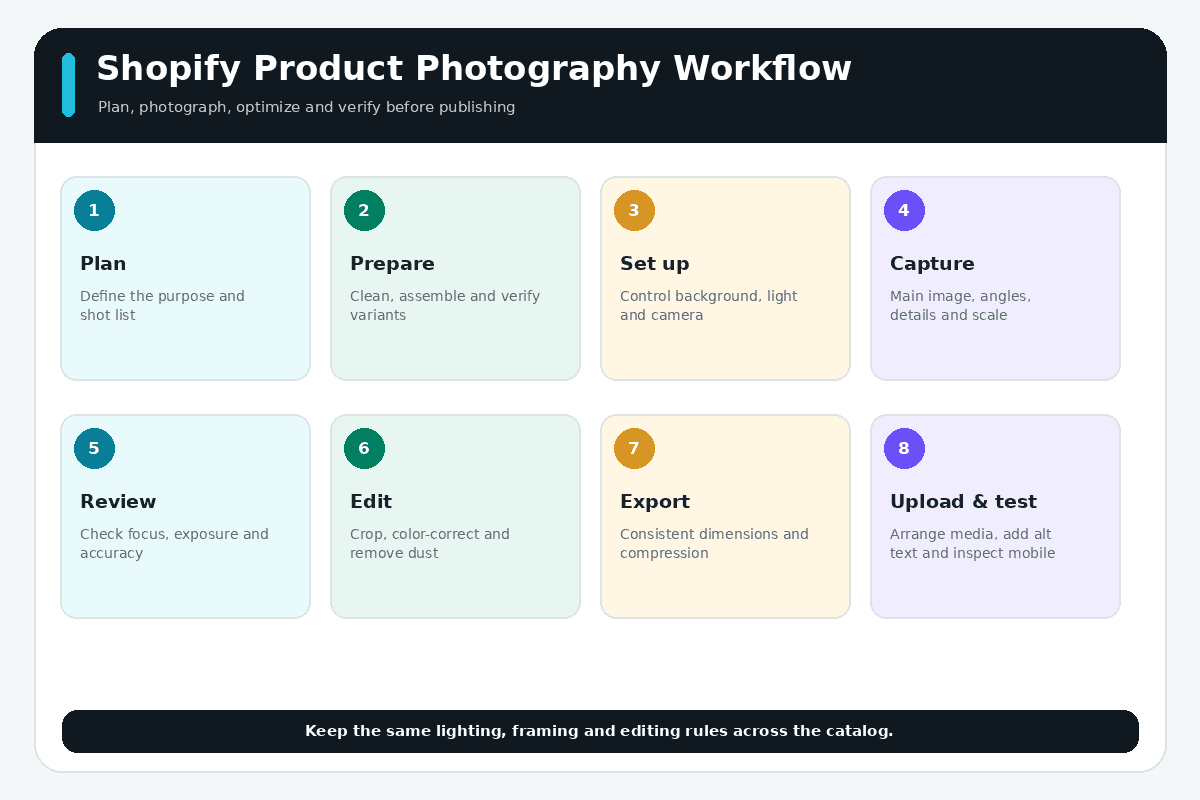
1. Define the Purpose of Every Image
Write down the customer question each photograph will answer. Separate required product-page images from optional homepage, collection, advertisement, email, and social-media assets. Different placements may need different crops, but one well-planned shoot can produce material for several channels.
2. Prepare the Product
Clean fingerprints, dust, labels, wrinkles, lint, loose threads, and packaging damage before the camera comes out. Charge devices, assemble parts, match pairs, steam clothing, and confirm that the photographed variant is the one listed in Shopify. Fixing the physical product is faster and more honest than rebuilding it in editing software.
3. Build a Repeatable Set
Mark the tripod, table, backdrop, product, and light positions so you can reproduce the setup later. Record the camera height, distance, orientation, lens or zoom level, and lighting conditions. Consistency matters when a new variant is added months after the original shoot.
4. Control the Light
Turn off mixed household lighting when using daylight because different light sources can create conflicting color casts. Place the product near a large window, diffuse harsh direct sun, and bounce light from the opposite side with white foam board. Move the light or reflector before trying to repair severe highlights and shadows later.
5. Stabilize and Configure the Camera
Clean the lens, use the highest-quality camera mode appropriate for your workflow, disable distracting filters, and stabilize the device. Tap the product to set focus, prevent exposure from changing between nearly identical shots, and use the timer or a remote trigger to avoid camera movement. Avoid digital zoom; move the camera or crop carefully instead.
6. Capture the Complete Shot List
Take the main image first, then angles, details, scale, use, packaging, included items, and variants. Review focus and exposure at full size before dismantling the set. Photograph a few framing options when the image may be used in square product cards, horizontal banners, and vertical social posts.
7. Edit for Accuracy and Consistency
Correct exposure, white balance, crop, straightening, dust, and minor background distractions. Match crops and margins across a collection. Do not remove damage from a product that will be shipped, reshape the item, change a real color, invent texture, add accessories, or make a result appear better than customers can reasonably expect.
AI tools can assist with background cleanup and layout experiments, but the final image still needs human review for product accuracy. The Shopify AI Store Builder review explains the same broader principle: automated tools create a starting point, not a completed store.
8. Export and Organize the Files
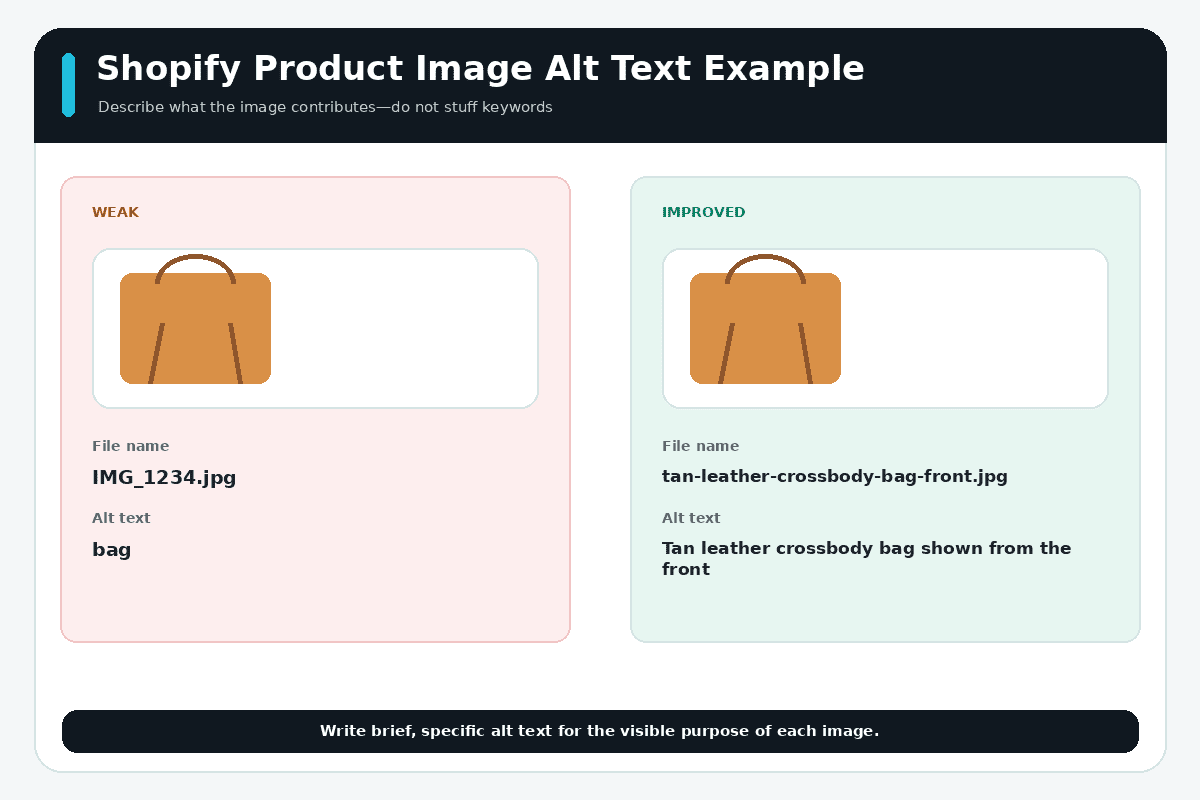
Keep an archived master and export separate web-ready copies. Use descriptive file names such as tan-leather-crossbody-bag-front.jpg instead of camera-generated names. Store the original, edited master, web export, and usage rights in a predictable folder structure.
9. Upload and Arrange the Images in Shopify
Add the media to the product, place the strongest accurate image first, order the gallery logically, connect variant images, and write concise alt text. Follow my step-by-step Shopify store tutorial if you need the complete product, theme, payment, shipping, domain, and launch workflow.
10. Test the Finished Product Page
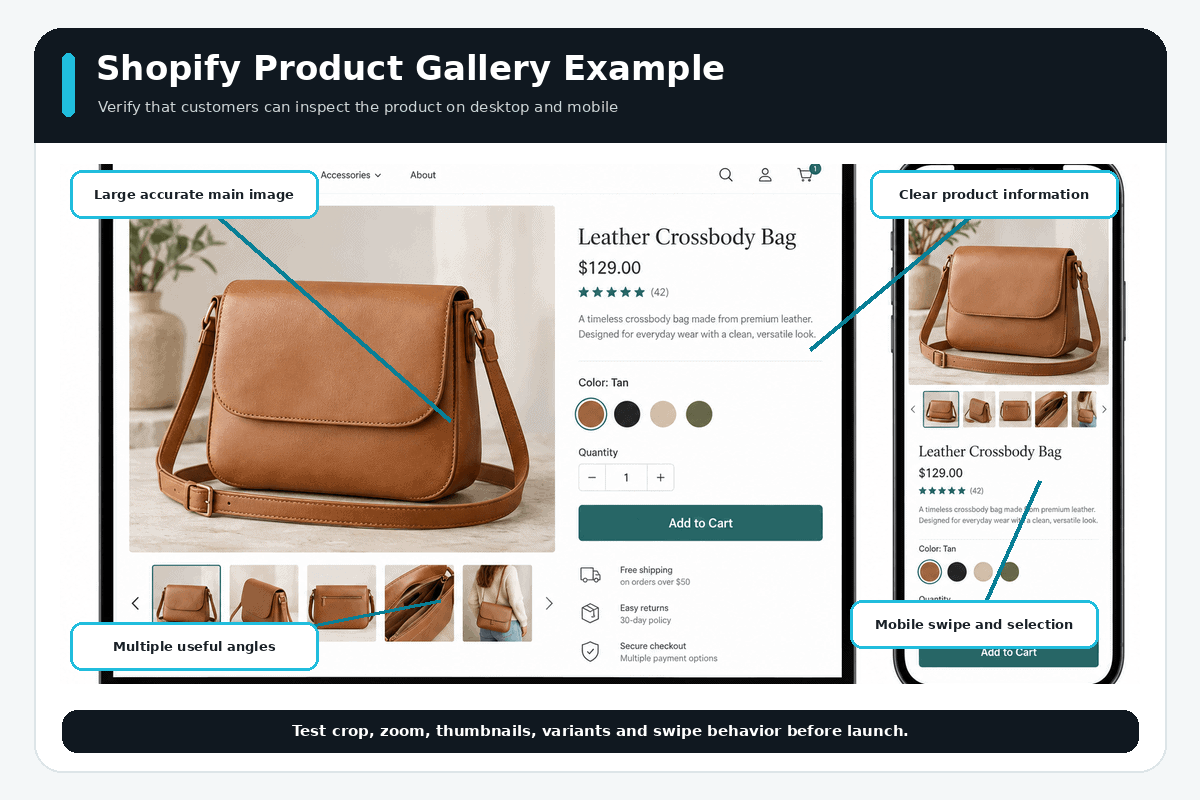
Inspect collection cards and the complete product page on a phone and desktop. Test image order, crop, zoom, swipe behavior, thumbnails, variant selection, video playback, page speed, and the relationship between images and the written description. Before launch, complete the Shopify store launch checklist.
Shopify Image Size, Format, and Optimization
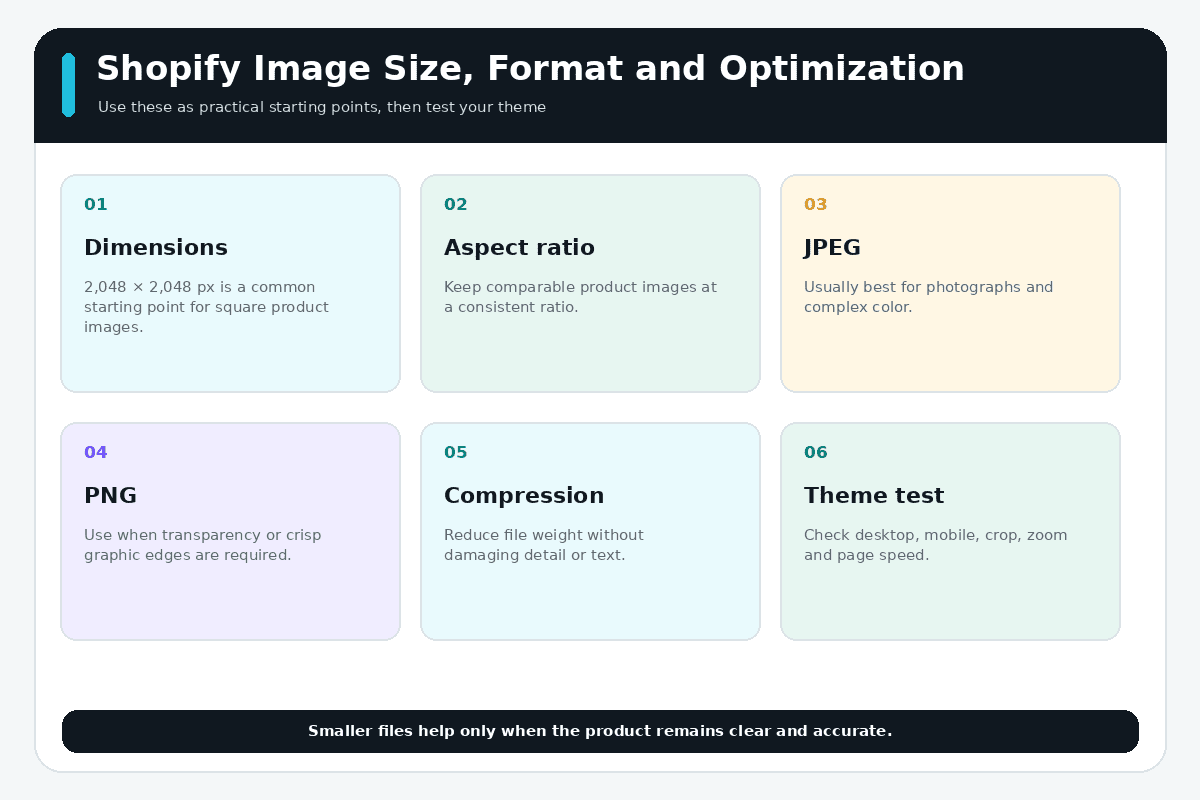
Do not upload the largest file your camera can produce simply because Shopify accepts it. The goal is enough resolution for a sharp display and useful zoom without creating unnecessary page weight.
- Dimensions: Shopify commonly recommends 2,048 × 2,048 pixels for square product images. Check your theme and zoom behavior before standardizing the catalog.
- Aspect ratio: use a consistent ratio for similar images so products align cleanly in collections and galleries.
- JPEG: usually appropriate for photographs and complex color because it can produce a smaller file.
- PNG: useful for transparency, text-heavy graphics, logos, and flat-color artwork when the larger file is justified.
- WebP: supported by Shopify, although Shopify can also deliver modern formats automatically through compatible browsers and themes.
- Compression: reduce file weight while checking the exported image at full size for artifacts, blurred text, banding, or damaged edges.
Shopify’s current image documentation explains supported formats, automatic delivery behavior, and upload limits. Limits differ across parts of the admin, so verify the requirement for the specific image type you are uploading.
How to Write Product Image Alt Text
Alt text describes the purpose and visible content of an image for customers using assistive technology and when an image cannot load. Write a brief, specific description that would help someone understand what the photograph contributes.
- Describe the product, variation, view, action, or important detail shown.
- Include a relevant product term naturally when it accurately describes the image.
- Avoid keyword lists, promotional claims, “image of,” and details that are not visible.
- Do not reuse identical text when each photograph communicates something different.
- Leave purely decorative imagery empty when appropriate rather than forcing an unnecessary description.
Shopify recommends brief, descriptive alt text and currently suggests staying near 125 characters or fewer. Its alt-text documentation explains how to add it to product media. For the broader search workflow, follow my Shopify SEO guide for beginners.
Product Photography Ideas by Store Type
Clothing and Accessories
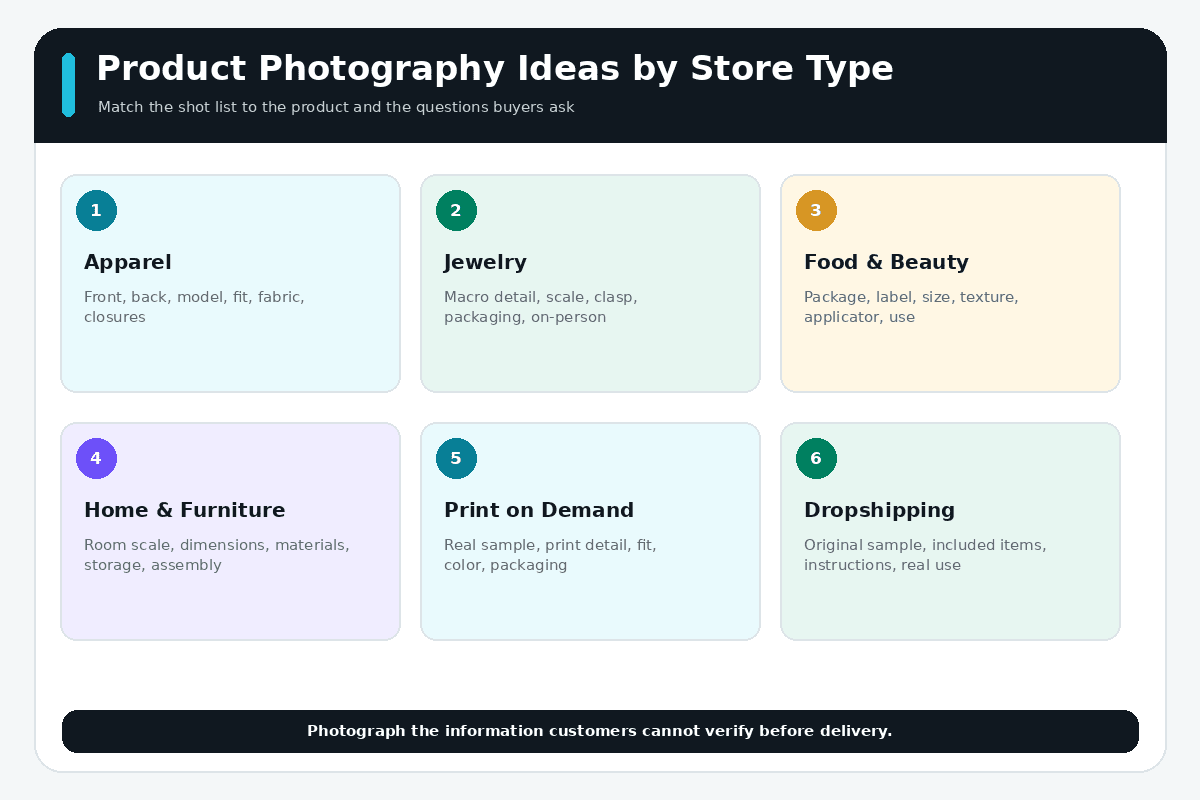
Use clean front and back images, close-ups of fabric and construction, model photographs from several angles, accurate color variations, and clear fit information. State the model’s relevant measurements and displayed size. Photograph pockets, closures, lining, stretch, texture, and details that influence comfort or care.
Jewelry and Small Products
Use macro details, a scale reference, multiple angles, clasp or closure demonstrations, packaging, and an on-person image when appropriate. Control reflections and fingerprints carefully. Do not enlarge the product so dramatically that customers misunderstand its real size.
Beauty, Food, and Consumable Products
Show the sealed package, label, size, texture, consistency, applicator, serving or use context, and everything included. Keep ingredient and regulatory claims accurate. Photograph the actual product condition customers should expect and follow applicable food, cosmetic, health, and advertising rules.
Home Goods and Furniture
Combine neutral-background views with photographs in a correctly scaled room. Show dimensions, materials, texture, drawers, doors, underside, assembly points, storage capacity, and included hardware. Avoid wide-angle distortion that makes a space or object appear larger than it is.
Print-on-Demand Products
Mockups are useful for testing layouts, but order samples and photograph the real printed product before depending on it for sales. Show print placement, color, texture, garment fit, packaging, and a close-up of production quality. My Shopify print-on-demand guide covers samples, providers, pricing, fulfillment, and launch.
Dropshipping Products
Do not rely only on the same supplier photos used by competing stores. Order samples, confirm what customers receive, and create original images of the product, packaging, instructions, accessories, scale, and real use. Review the supplier-control and fulfillment risks in my Shopify dropshipping guide.
Digital Products
Digital products need visual previews rather than traditional physical photos. Show sample pages, dashboard screens, templates in use, lesson previews, file contents, and realistic output examples without exposing the entire paid product. The guide to selling digital products on Shopify explains delivery, product pages, pricing, policies, and testing.
Using Supplier, Customer, and AI Images
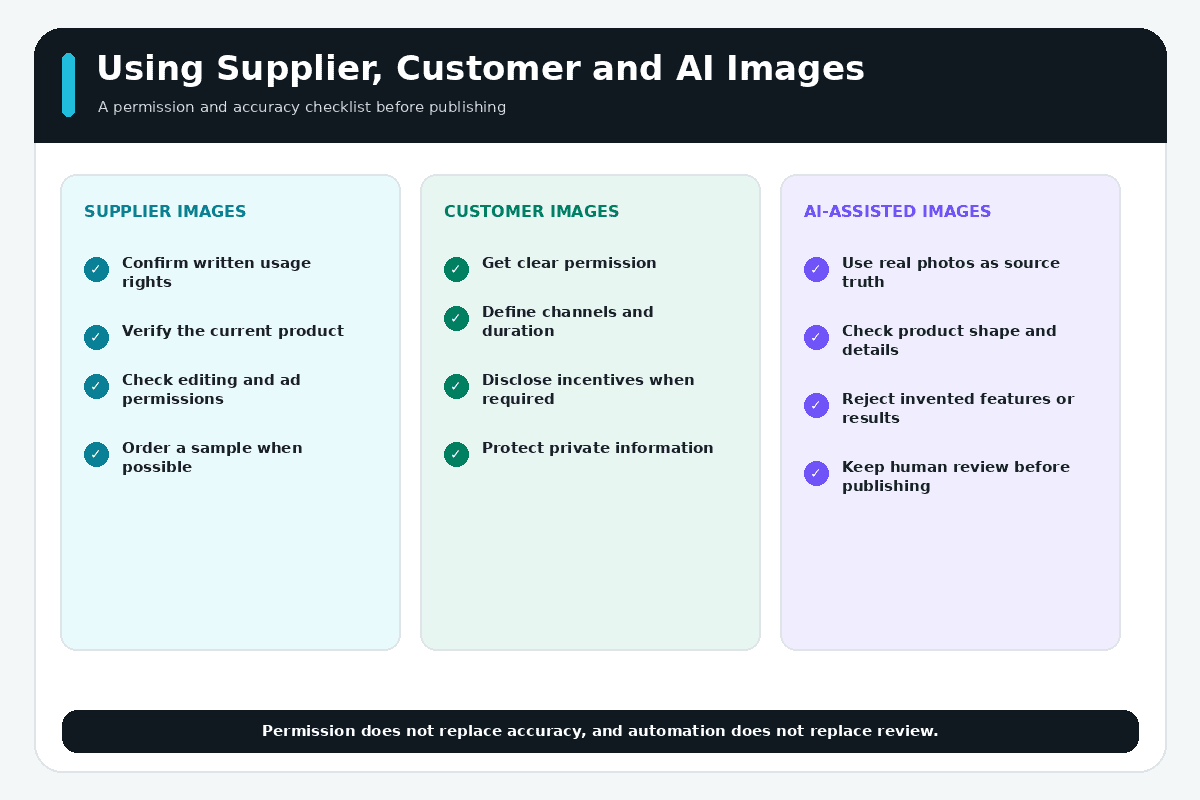
Only publish images you created or have permission to use. A supplier providing a photograph does not automatically answer whether you can edit it, use it in paid advertising, share it with affiliates, or continue using it after the relationship ends. Keep written licenses and usage records.
Obtain appropriate permission before republishing customer photographs or reviews. Define where the content may appear, how long it may be used, whether it can be edited, and whether compensation or disclosure is required.
AI-generated scenes and backgrounds should not invent product features, change proportions, replace the actual item, or create a result customers will not receive. Use the real product as the source of truth and review hands, text, labels, reflections, shadows, logos, and physical details closely.
How Product Photography Fits Your Shopify Strategy
Strong photographs support several parts of the store, but they cannot replace a validated product, clear offer, accurate pricing, reliable fulfillment, or qualified traffic. Use the Shopify first-sale guide to connect product presentation with customer research, an offer, outreach, traffic, and funnel measurement.
Marketplace and platform choices also affect image requirements and shopper expectations. Compare marketplace discovery with store ownership in Shopify vs. Etsy. Compare a hosted store with an open-source commerce stack in Shopify vs. WooCommerce, or compare Shopify with a flexible publishing system in Shopify vs. WordPress.
If you want to explore the product editor and theme before committing, read the Shopify free trial guide. It explains the signup process and what to verify before choosing a paid plan.
Common Shopify Product Photography Mistakes
- Using blurry, low-resolution, or poorly focused photographs.
- Mixing daylight and indoor lights that produce inconsistent color.
- Changing backgrounds, crop, margins, and aspect ratio throughout a collection.
- Showing only one attractive angle and hiding the back, interior, scale, or important limitations.
- Using supplier images without confirming permission or ordering a sample.
- Editing the product until its color, material, dimensions, texture, or included items are inaccurate.
- Using props that customers might mistake for included components.
- Uploading enormous files without compression or mobile testing.
- Writing repetitive or keyword-stuffed alt text.
- Failing to reshoot an image after the product or packaging changes.
The broader Shopify mistakes to avoid guide covers product pages, apps, SEO, checkout, shipping, mobile usability, analytics, and ongoing maintenance.
Shopify Product Photography Checklist
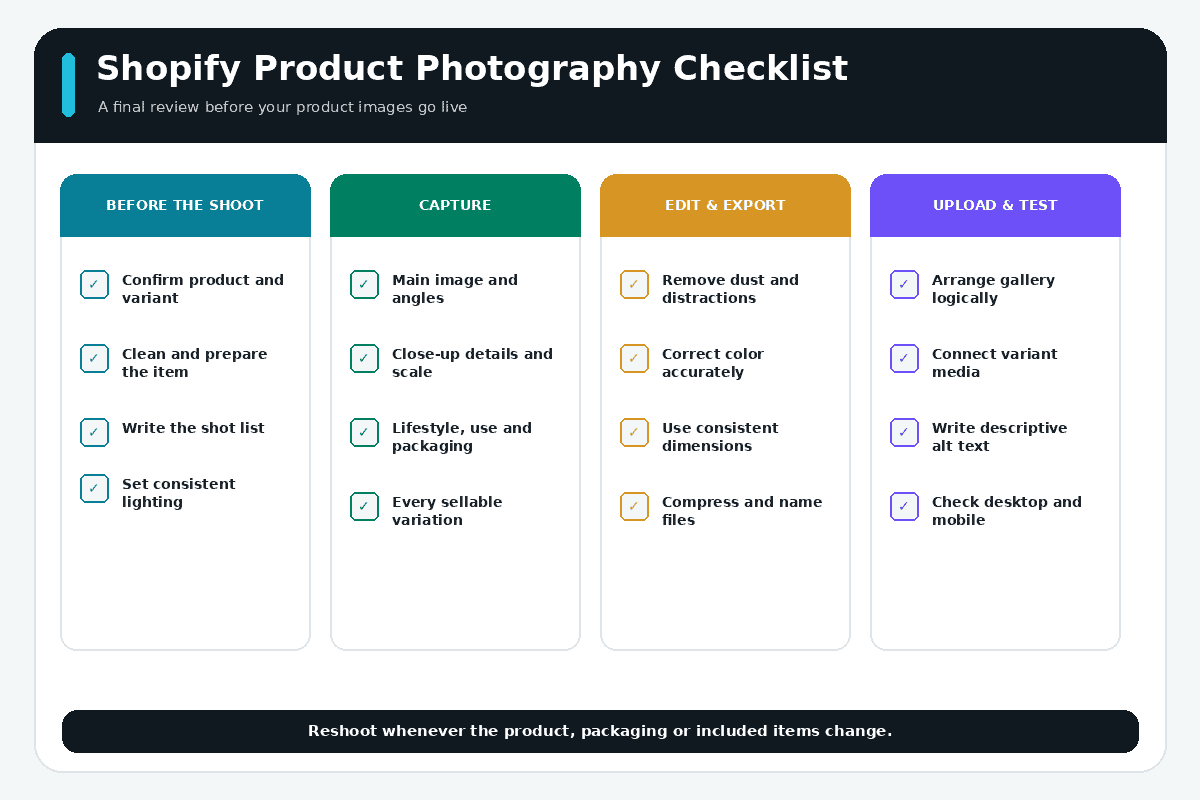
- Confirm the photographed product and variant match the listing.
- Clean, assemble, steam, charge, and prepare the item.
- Capture the main image, required angles, and close-up details.
- Show size, fit, scale, operation, packaging, and included items where relevant.
- Photograph every sellable variation accurately.
- Match lighting, camera position, crop, margins, and aspect ratio.
- Edit for consistency without changing the actual product.
- Archive master files and export compressed web copies.
- Add descriptive file names and alt text.
- Test collection cards, product galleries, zoom, variants, and mobile display.
Shopify Product Photography FAQs
Can I take Shopify product photos with a phone?
Yes. A modern smartphone can produce effective ecommerce photographs when the lens is clean, the camera is stable, the light is soft and sufficient, the background is controlled, and the product is in focus. Lighting, preparation, and consistency often improve beginner results more than buying a more expensive camera.
How many product photos should I add?
Use enough images to answer the important buying questions without adding repetitive media. A simple item might need four or five photographs, while apparel, furniture, technical equipment, bundles, or products with important details may need considerably more. Choose by information value rather than a fixed number.
What should the first Shopify product image show?
The first image should clearly and accurately show the complete product because it may appear across collection pages, featured sections, the cart, and checkout. Use a clean composition that remains understandable at thumbnail size.
Should Shopify product images be square?
Square images are a practical choice for many catalogs, but the right ratio depends on the product and theme. Clothing may benefit from a portrait ratio, while wide products can need a landscape presentation. The important part is using a consistent ratio for comparable images and testing theme cropping.
What image size should I use for Shopify products?
Shopify commonly recommends 2,048 × 2,048 pixels for square product images because it supports a sharp display and useful zoom. Treat that as a starting point, then test your theme, product type, compression, and mobile performance.
Can I use supplier product photos?
Only when you have permission and the images accurately represent what your customers will receive. Order samples, verify the packaging and quality, document the usage rights, and create original photographs when possible so the store does not look identical to competing sellers.
Can I use AI for Shopify product photos?
AI can assist with background cleanup, resizing, or concept development, but it should not invent features, change the actual product, or create misleading results. Review every generated or edited image carefully and keep real product photographs as the source of truth.
Do product images affect Shopify SEO?
Images can affect accessibility, page performance, product understanding, and search context. Use descriptive file names and alt text, compress files, and connect the images to a useful product page. Image optimization alone cannot make an unhelpful page rank.
Should I hire a professional photographer?
Hire a professional when the catalog is large, reflections or materials are difficult, consistent color is critical, models or complex sets are required, or the cost of weak images exceeds the photography budget. A beginner can still start with a controlled DIY setup and outsource the highest-value hero images later.
Final Verdict
Effective Shopify product photography is not about owning the most expensive camera. It is about giving customers accurate, complete, and consistent visual information. A clean main image earns attention, while angles, details, scale, lifestyle context, packaging, variants, and in-use photographs reduce uncertainty.
Begin with one product and a written shot list. Build a repeatable setup, use soft light, stabilize the camera, prepare the item carefully, and review the files before dismantling the set. Edit for clarity rather than perfection, then test the final gallery on the devices your customers use.
When you are ready to create the store, start Shopify and build your first product page. Review the current offer and final terms before selecting a plan.

- Shopify Product Photography Ideas for Beginners - October 15, 2026
- How to Sell Digital Products on Shopify: Step-by-Step Guide - October 15, 2026
- What to Sell on Shopify: 30 Product Ideas for Beginners - October 15, 2026

Leave a Reply
Want to join the discussion?Feel free to contribute!